

Most traders obsess over:
indicators
confirmations
strategies
entries
But they ignore the most important factor in trading:
Location.
A mediocre setup at a great location
beats a perfect setup at a bad one — every time.
Let’s break down high-probability trade locations in a simple, usable way 👇
🔸 1. What a Trade Location Actually Is
A trade location answers this question:
👉 Is price in an area where a reaction makes sense?
Markets don’t react everywhere. They react at specific zones where:
decisions were made before
imbalance exists
liquidity sits
structure changes
If price is in the middle of nowhere,
your setup already has low probability.
🔸 2. Why Middle-of-Range Trades Fail
The most dangerous place to trade is the middle.
In the middle:
risk-to-reward is poor
direction is unclear
volatility is random
emotions dominate decisions
Many traders lose money not because their setup is bad —
but because they trade in no-man’s-land.
🔸 3. The Three Best High-Probability Locations
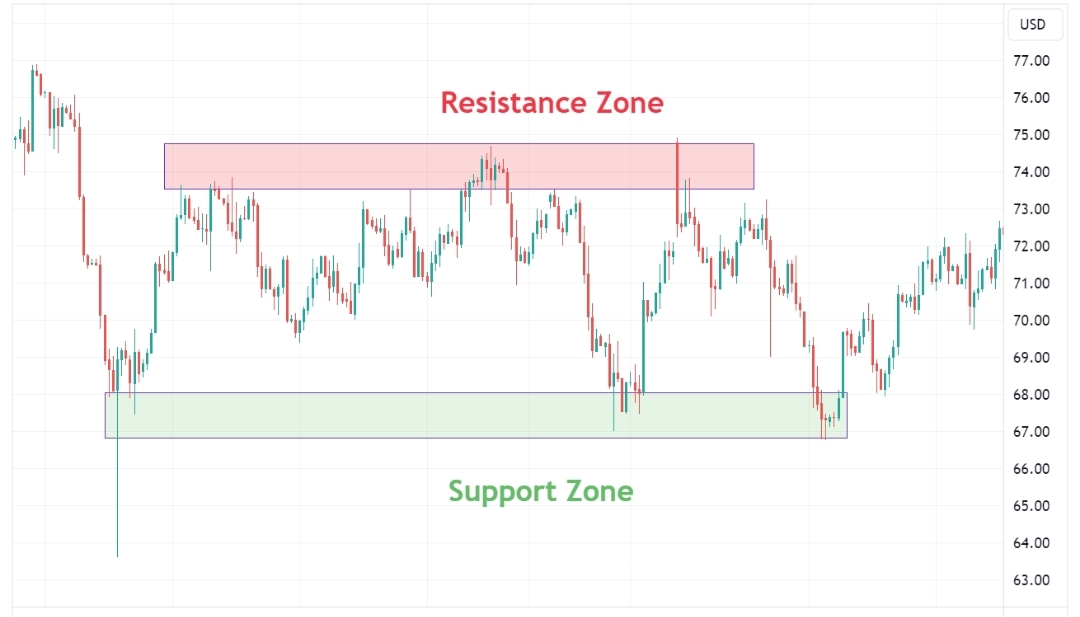
✅ 1. Range Extremes
Top or bottom of a clear range.
Why it works:
liquidity is stacked
stops are obvious
reactions are common
risk can be defined clearly
This is where patience pays.
✅ 2. Pullbacks in Strong Trends
In trends, price doesn’t move in a straight line.
High-probability locations are:
higher lows in uptrends
lower highs in downtrends
Chasing breakouts = late. Waiting for pullbacks = professional.
✅ 3. Previous Key Reaction Zones
Areas where price:
strongly rejected
impulsively moved away
broke structure
Markets remember these zones. Not forever — but long enough to matter.
🔸 4. Premium vs Discount (Very Important)
This concept alone filters bad trades instantly.
Simple idea:
Buy cheap, sell expensive
Not the other way around
In bullish conditions:
best longs come from discount areas
worst longs come from premium areas
In bearish conditions:
best shorts come from premium areas
worst shorts come from discount areas
Many traders do the opposite — and don’t realize it.
🔸 5. Why Indicators Fail at Bad Locations
Indicators can only work if location is correct.
At bad locations:
RSI overbought means nothing
MACD crosses fail
patterns break down
confirmations lie
Location gives indicators meaning. Without it, they’re noise.
🔸 6. High-Probability Location Checklist
Before looking for any entry, ask:
❓ Is price near a range extreme?
❓ Is this a pullback in trend?
❓ Has price reacted strongly here before?
❓ Is risk clearly defined?
❓ Is reward clearly larger than risk?
If most answers are “no” — don’t trade.
No setup can save a bad location.
🔸 7. Why Good Locations Feel Uncomfortable
This is important psychologically.
High-probability locations often:
feel scary
go slightly against you
require patience
don’t look obvious
feel “too early”
Low-probability locations feel exciting.
Markets reward discomfort —
not excitement.
🔸 8. A Simple Rule That Improves Results Fast
If price hasn’t reached a key location — you’re not allowed to trade.
This rule alone:
reduces overtrading
improves R:R
calms emotions
increases patience
Professional traders wait for price. Retail traders chase it.
Trading is not about finding more setups.
It’s about waiting for better locations.
Good locations make:
entries easier
stops logical
targets realistic
emotions manageable
If you fix where you trade,
how you trade becomes much simpler.
Educational content. Not financial advice